Key takeaways: How to redirect old category pages to new
- 301 redirections is an HTTP signal to search engines & browsers that a page has been permanently moved to a new location
- If you want to change the URL pattern of your category pages, you can redirect old category pages to new ones using the bulk redirect feature on the RankMath SEO plugin
- There are significant differences between 301 & 302. Use it very cautiously
Imagine moving to a new location & nobody in your network knows about it. How do they find you? There’s no way to communicate with you. The same thing happens with a website (or a page) when it’s moved to a new URL.
It’s very important to manage redirections for your website, just like you have to manage yourself moving to a new place.
If you want to learn how to redirect SEO traffic from old pattern category pages to new category pages, then this post is for you. Custom category pages can help you with SEO, rebranding, improving UX.
Especially, if you want to create custom category pages with new URL patterns/structure.
With that said, let’ me share’s begin.
Why update the URL structure?
When you have a decently large site, it’s important to manage the whole structure of your site so that it’s easy for users to find what they’re looking. Furthermore, even search engines can crawl pages effectively.
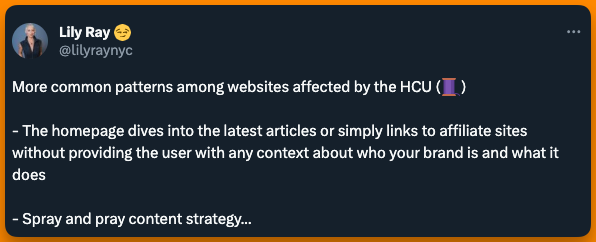
With the latest Helpful content update, Lily Ray has found that if the homepage is simply linking to the affiliate page and just the latest articles without adding any value, those sites have lost traffic.

This means, that instead of linking to the latest pages, linking to the category page from the homepage is much more fruitful. Especially when your category pages are custom-made and have a proper structure based on sub-categories.
The default category pages by WordPress have its own limitations but that’s okay, it can’t be perfect out of the box. But you can create custom category pages that match your needs.
Since you want to redirect the old URL pattern to a new one, I’ll assume you have similar plans with your category pages.
When you’re updating the category pages, you should 301 redirect all the traffic from the old URL to the new URL.
‘301 is a status code for the browser & web server that tells them that the requested URL is moved to a new location permanently.‘
Let’s dive deeper into understanding 301 redirects first.
Understanding 301 Redirects
Before we jump onto the meat of the post, there are a few things you should know. These fundamentals will help you make better decisions for complex redirection scenarios.
#1 What is 301 (permanent) redirect?
301 is an HTTP status code for search engines & browsers. When a web server sends this code to a web browser, it expects a redirection URL from the web server. The web browser then redirects the old URL to the new URL (as set up by the webmaster).
This also means that the crawler also sees the status code and takes note that the content from the old URL has been moved to a new URL & hence crawls the content again. The crawler will never visit the old URL for any updates, it might even deindex the old URL from the search database.
To make it easy to remember, imagine the 301 status code as an informer. The code simply informs the web browser (& crawler) that the content has been moved to a new location and even provides the new URL whenever requested.
#2 Types of Redirects & its Impact
HTT protocol is complex and simple at the same time. Depending on how you use it, the context of the status code may change.
Here are some status codes that you need to know, especially if you manage your website yourself.
| Code | Meaning | Impact |
| 1XX | Informational | Low |
| 100 | Continue | Low |
| 101 | Switching Protocols | Low |
| 2XX | Success | Low |
| 200 | OK | Low |
| 201 | Created | Low |
| 202 | Accepted | Low |
| 204 | No Content | Low |
| 3XX | Redirection | Low |
| 301 | Moved Permanently | High |
| 302 | Found (Moved Temporarily) | Medium |
| 304 | Not Modified | Low |
| 4XX | Client Errors | High |
| 400 | Bad Request | High |
| 401 | Unauthorized | High |
| 403 | Forbidden | High |
| 404 | Not Found | High |
| 405 | Method Not Allowed | Medium |
| 5XX | Server Errors | High |
| 500 | Internal Server Error | High |
| 502 | Bad Gateway | High |
| 503 | Service Unavailable | High |
| 504 | Gateway Timeout | High |
Note: For the sake of this post, we will be talking about 301 & 302 only. All other status codes are subjective and deserve a dedicated post to help you understand better. Learn more about different types of redirects here.
Importance of 301 Redirects for SEO & UX
There’s a reason why most web hosting companies charge for migrating your website to a new location. There’s a lot that needs to be taken care of, one of those things is redirection. It holds significant value as you may lose all the traffic you’ve built over the years if traffic is going to broken links or 404 pages.
Let’s explore some of the benefits of redirecting traffic:
- Preserving organic traffic: When you set up sources of traffic, you don’t want to disturb them. Whether organic or paid, the last thing you want is to lose that traffic. When you set up the right redirections (with the right HTT protocols) you not only preserve the existing traffic but also create room for even more traffic.
- Avoids duplicate content: Search engines penalize sites for having duplicate content (directly or indirectly). Redirections can help you avoid that penalty. Redirections not only avoid penalties but also help you get more traffic. Since you’ve consolidated duplicate content into one and now your pages are ranking for more keywords, hence more traffic.
- Better user experience: When users are served what they’re looking for, they’re more likely to come back (since they trust your site). Redirecting users to the right page also ensures that users don’t bounce off your website. If you don’t know already, bounce rate is a ranking factor.
- Updating internal links: When it comes to On-Page SEO, nothing is more helpful than internal links. Redirections help with updating internal links when you update the URL structure of your website. If you don’t redirect, all the internal links will result in 404 errors & that is a big red flag for search engines.
- Better navigation: Redirections can also provide your users with proper navigation. When you have the right redirections in place, you can help users navigate to the right page from the right spot on your website. For example, redirecting users to an alternative product page when the product they searched for is no longer available.
Choosing a new URL structure for category pages
Now that you understand the importance of 301, let me help you understand how to pick the right URL pattern. In case you haven’t picked already or want to be double-sure.
The URL pattern you chose should satisfy the SEO guidelines, not as a rule but out of courtesy. You don’t want complicated URL structures that the end users and web crawlers find difficult to use & understand.
Here are some best practices to choose (if not already chosen) a URL pattern:
#1 Keep It Short and Relevant:
- Limit the length of your URLs to make them concise and user-friendly
- Include only essential keywords and avoid unnecessary words or characters
- Ensure that the category name in the URL accurately reflects the page’s content
#2 Use Keywords Wisely:
- Incorporate relevant keywords that describe the category and its contents
- Place the most important keywords closer to the root of the URL for higher SEO impact
- Avoid keyword stuffing; use keywords naturally and sparingly
#3 Follow a Logical Hierarchy:
- Organize category pages in a logical hierarchy that mirrors your site’s structure
- Use subdirectories (e.g., example.com/products/category) or subdomains when applicable
- Ensure that the URL path clearly indicates the parent and child categories
#4 Use Hyphens as Separators:
- Use hyphens (-) as word separators in your URLs (e.g., example.com/category-name)
- Avoid underscores (_) or spaces, as they can cause issues with readability and SEO
- Hyphens are preferred by search engines and enhance URL readability
#5 Avoid Dynamic Parameters:
- Minimize the use of dynamic parameters, such as query strings (e.g., example.com/category?id=123)
- Instead, opt for static, descriptive URLs that users and search engines can understand
- Static URLs are more user-friendly and tend to perform better in search results
This is all you need to understand the whole concept of redirecting. Now it’s time for the meat of the post. Let’s dive into redirecting old category pages to new ones using the RankMath SEO plugin.
Preparing for redirecting category pages using RankMath
Redirecting becomes very complex when you have to get your hands dirty in code. As a WordPress user, RankMath makes it super easy to manage everything related to redirections, and a lot of that is for free. Before you get started with redirections, you need to make a couple of changes.
#1 Installing & configuring RankMath SEO plugin for WordPress
If not already, install RankMath from the WordPress plugins directory.
Here’s how to Install RankMath for your WordPress website:
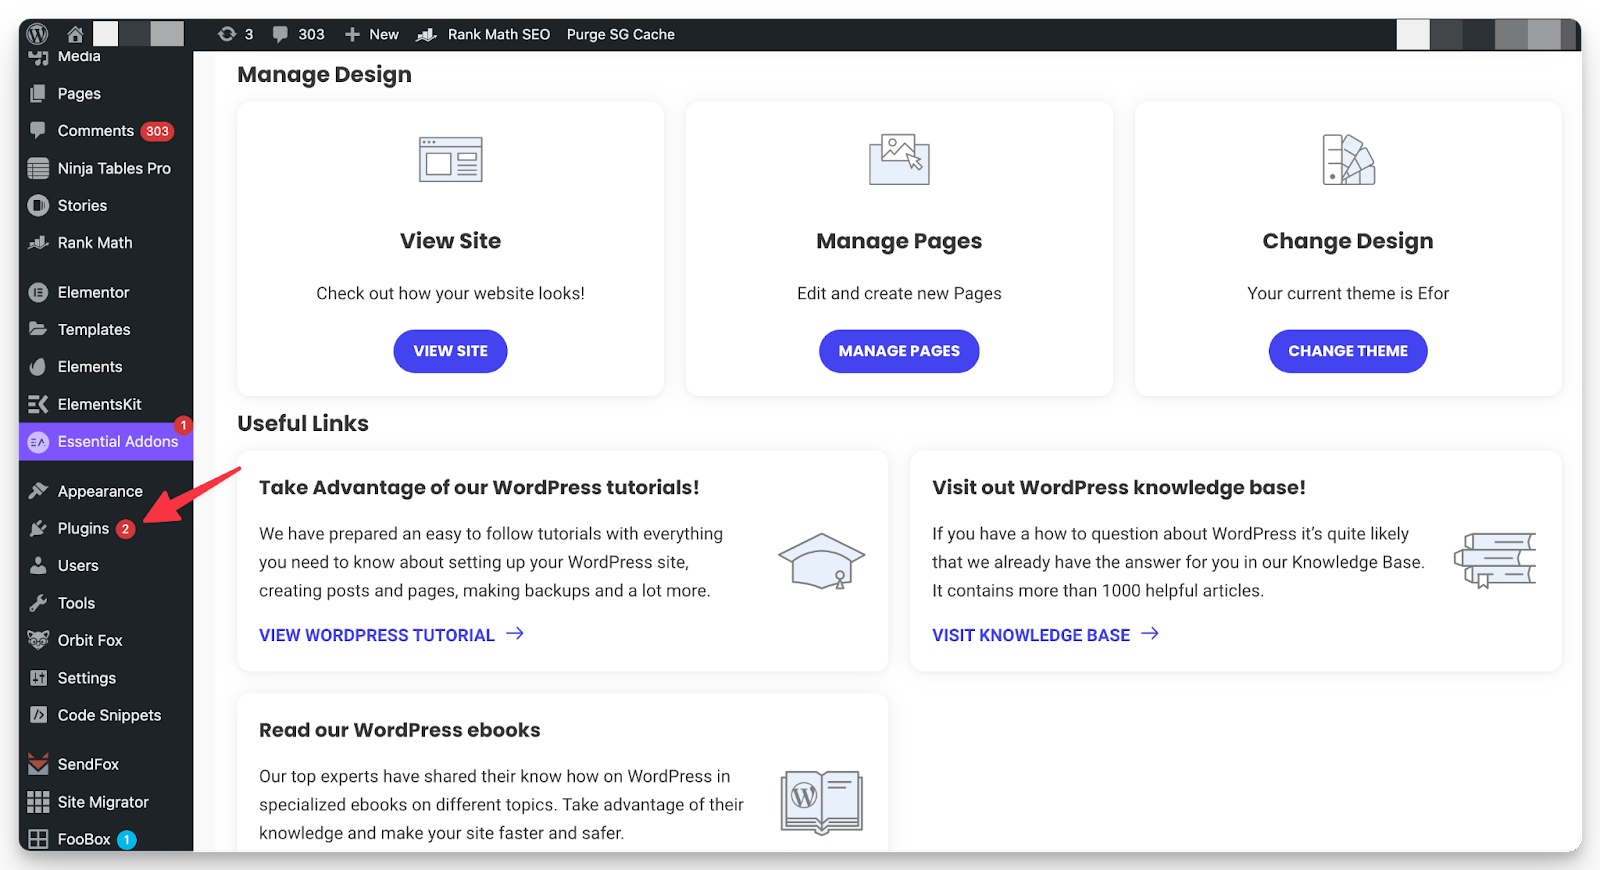
- Go to WordPress Dashboard > click on Plugins

- Click on the Add New button
- Search for “RankMath” and then click on the “Install Now” button against the RankMath plugin in search results.
- Click on the “Activate” button to activate the plugin
- Once activated, click on RankMath in the left panel of the WordPress dashboard to start the setup wizard
- Set up the plugin as per your requirements. Considering the scope of this guide, we will skip the setup process & focus on Redirections only. Refer to this guide to learn more about the setup wizard
- After you finish setting up the plugin, navigate to WordPress Dashboard > Rank Math Dashboard & switch to Advanced Mode as shown below
- Scroll down until you find the “Redirection” menu. Toggle on the Redirections as shown below. Make sure Redirection appears under the RankMath menu in the navigation panel of the WordPress
Now your WordPress website is ready to manage any redirections you may need. For FREE!
#2 Creating new category pages (new pattern URLs)
You’re here because you want to update the category URL and redirect to a new pattern without losing any SEO value. To do that, first, you will need to create category pages with the new URL pattern that you want to implement. If you have already created the new pattern category pages, skip this step.
For example, if you want to change your category page pattern from https://example.com/category/games to https://example.com/topics/games. This can be for several reasons but the most common reason why people prefer changing the pattern of category page URLs is that the default pattern is not aligned to your brand’s strategy. It’s too generic.
Custom category URL patterns are useful, especially for creating a silo structure of internal links.
With that said, here’s how to create new category pages in WordPress.
Step 1: On the WordPress dashboard, hover over the Posts section in the panel on your left hand as shown below. Don’t click on Posts, else you will be redirected to the Posts dashboard.
Step 2: Click on Categories from the menu and you will be navigated to the Categories dashboard. Here, you can create all the categories that you want to change the pattern of. Enter the name, slug (the new URL pattern), parent category (if any) & description.
You can edit the description anytime. However, to change the Name and slug of the category, you will have to be careful. Updating the slug will require adding redirections and changing the name may require you to change the slug as well.
Step 3: Repeat step 2 till to create all the category pages that you want to replace with the new URL pattern. Double-check if you created new pattern URLs for all the categories.
Step 4: Create a CSV file with all the URL details (old and new URLs). There are third-party plugins to export category URLs, but the output isn’t that efficient. Most plugins export the category names and not the URL. Take some time to do this manually or outsource to freelancers.
Step 5: Once you have all the categories in a CSV file, arrange the data in the format as shown below. At least the highlighted columns should be exactly in the same order. The column From will contain the old pattern URLs, and To will contain the new pattern URLs.
Be double sure of the whole date as the redirection is irreversible. Get it reviewed by someone else since you might get blindfolded by your work.

Note: Keep the CSV file created in Step 5 handy. It will be used in the bulk-redirection section.
301 Redirections using RankMath
Now that you have the new pattern for category pages ready, it’s time to redirect all the traffic the old pattern category page is getting to the new pattern. You don’t have to worry about the internal links, thanks to 301 redirection.
#1 Redirecting individual pages using RankMath
This one is a very simple usecase of redirection, especially for those who have never redirected pages before. This comes in handy when just a couple of pages have moved to a new location, or maybe you want to simply consolidate multiple pages into one.
To redirect individual pages using RankMath, follow these steps:
- Navigate to WordPress dashboard > RankMath > Redirections
- Click the “Add New” button in the Redirections dashboard
- In the Source URLs, enter the old URL. You can add multiple URLs as the source, especially if you have multiple pages that you want to redirect to one page (destination URL). Simply copy all the URLs and paste them into one column, new columns will be automatically created by the plugin.
- Select the appropriate redirection type from the menu. 301, 302 & 307 have different impacts on how redirected URLs are perceived by search engines & web browsers
- Click on the “Add Redirection” button to save changes
Note: Every time you need to add a redirect, this is how you can do it. You can even edit the existing redirections under the RankMath redirection module.
#2 Bulk redirecting using RankMath
You can redirect old category pages to new ones using the bulk redirect feature on RankMath SEO. For example. you want to redirect old pattern category pages like https://example.com/category/games to https://example.com/topics/games.
Notes:
- Bulk redirect is a pro feature, consider upgrading to redirect multiple pages in a jiffy
- Create a list of old category pattern URLs that you want to redirect to new category pattern URLs & save it as a CSV file beforehand. Make sure to clearly mention the from & to URLs in the CSV
- Double-check the CSV that you upload to the bulk redirection module. The action can’t be reversed
Follow these steps to bulk redirect category pages:
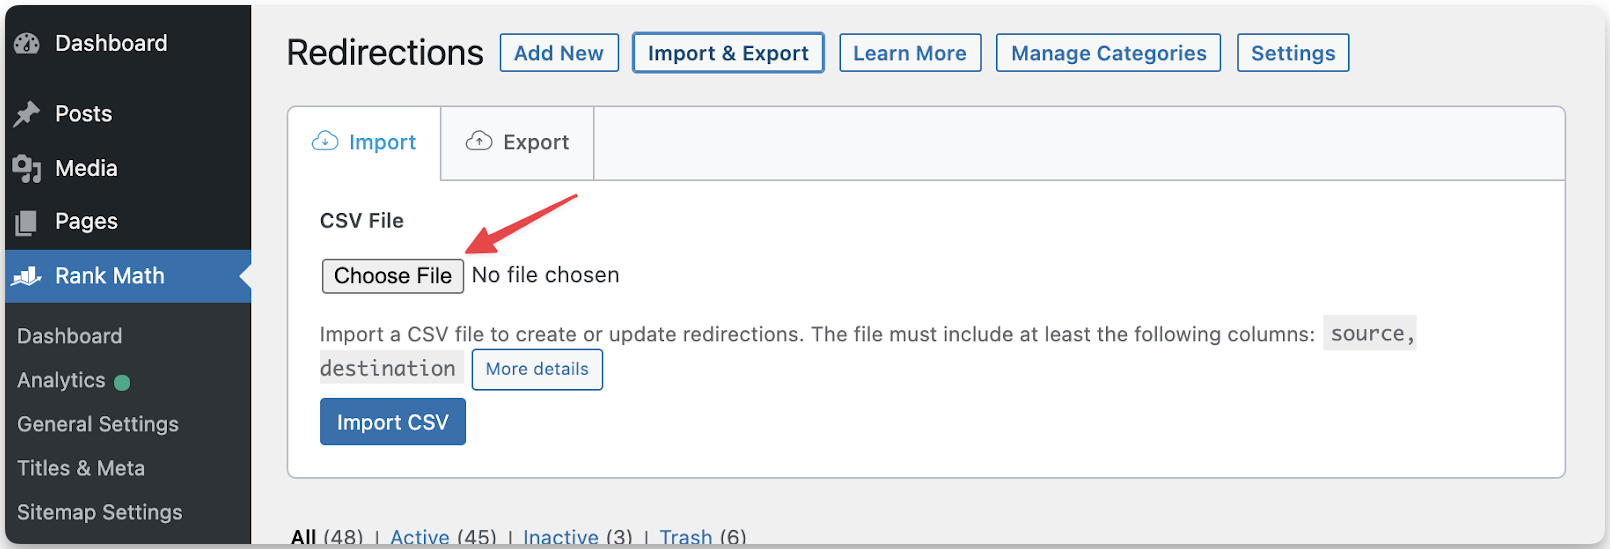
- On your WordPress dashboard, navigate to RankMath > Redirections. Then click on the Import/Export button
- Under the import tab, click on the “Choose file” button & then navigate to the file location of the CSV created in Step 5 of the previous section. Select and upload the file to RankMath for bulk redirection

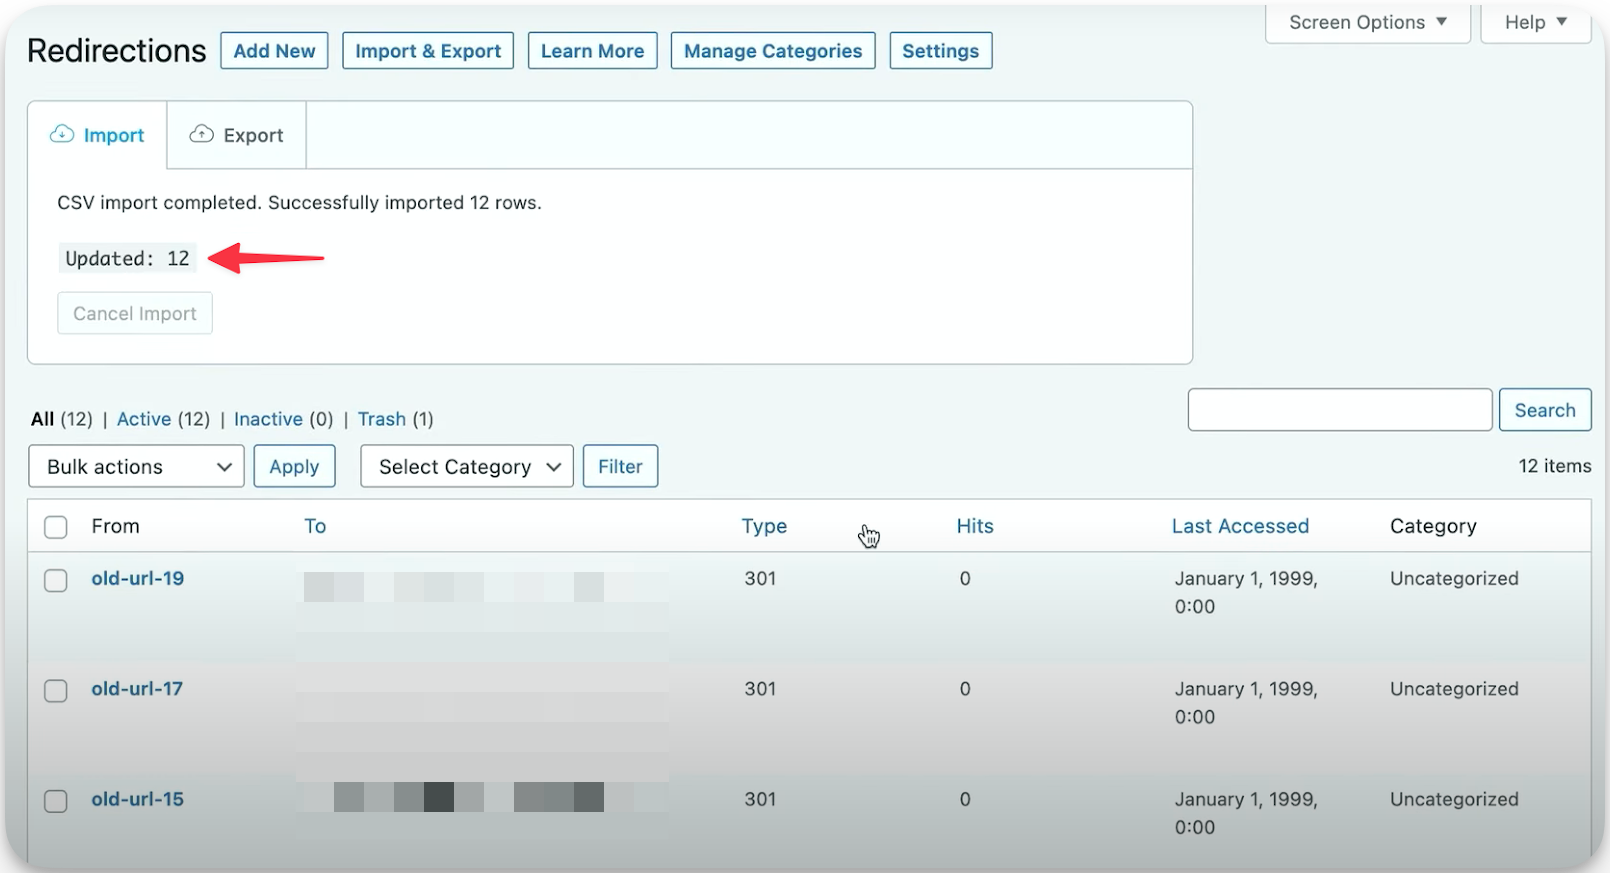
- Once uploaded all the records will be displayed in the Import dashboard and the redirections will be applied based on the data mentioned in CSV. Lastly, you can check the HTTP status code of the URLs to be sure

What to do after you have added redirections?
Once you have added new category pages and added the redirections, you will need to check a few things to ensure nothing breaks once everything is live.
#1 Update internal links
When you update the category page URLs, it’s important to update the internal links. At least in prominent and visible locations.
The menu is a classic example. Even though you have added the redirections, you should still update the URLs to look professional.
Also from a server standpoint, too many redirections will increase the load and may result in a slowdown. Especially if you have opted for shared web hosting.
Since you have added the redirections, all the traffic to the old URL will be diverted but to make the visible URL seamless, it’s better to update it. You don’t need to do it on priority, but make sure you don’t miss out on this.
#2 Update backlinks
Although it doesn’t make sense to have backlinks to category pages. But if you have linked category pages on portfolio sites or forums, it’s better to update the links and add new URLs.
Since such sources won’t be too many, it shouldn’t take too long. This doesn’t have any direct effect on SEO, it’s just that the load on servers can be reduced by directly requesting a new URL.
#3 Update sitemaps & request indexing
If you’re not a WordPress user, you may be required to update sitemaps manually. For WordPress users, the RankMath SEO plugin will take care of updating the sitemaps for you.
#4 Bulk indexing
If you have a large site you may be required to request indexing in bulk using Indexing API. Requesting to index ensures that all your pages are crawled by search engines and the latest content is served to your audience.
Frequently Asked Questions
What is 301 redirect?
301 redirect is an HTTP signal that instructs search engines & web browsers that the requested page has been permanently moved to a new URL. 301 redirection passes all the SEO link juice from the old URL to the new URL.
What is the difference between 301 & 302 redirects?
301 is a permanent redirect, meaning once a URL is declared as 301 redirects to a new URL, it can’t be changed. Use these in cases of redirecting old pages to a new one especially when consolidating pages. 302, on the other hand, is a soft redirect that instructs search engines about temporary redirection. Use this in case of redevelopment of page/site & redirecting users to a staging site with additional instructions for the users.
What is the difference between 302 & 404 HTTP status codes?
302 is a temporary redirect instructing search engines to redirect to the new URL as long as the requested URL has 302 as the HTTP status code. 404, on the other hand, informs users that the page they’re looking for isn’t at the location. 404 is bad from the UX perspective. 404 is page not found & 302 is found but moved temporarily to a new location.


